- 首发:2022-06-18 22:50:53
- 教程
- 7682
我是一个对噪音非常敏感的人,即使我在家里放了一个机柜,也是全无风扇被动散热的。我通常选择低功耗的设备作为边缘服务器,同时对部分无法完全避免风扇的设备进行改造,增强设备散热的同时降低噪音。
这里记录了我优化NAS和电脑主机的噪音的方案,供有同样困扰网友作为参考。
软件方案
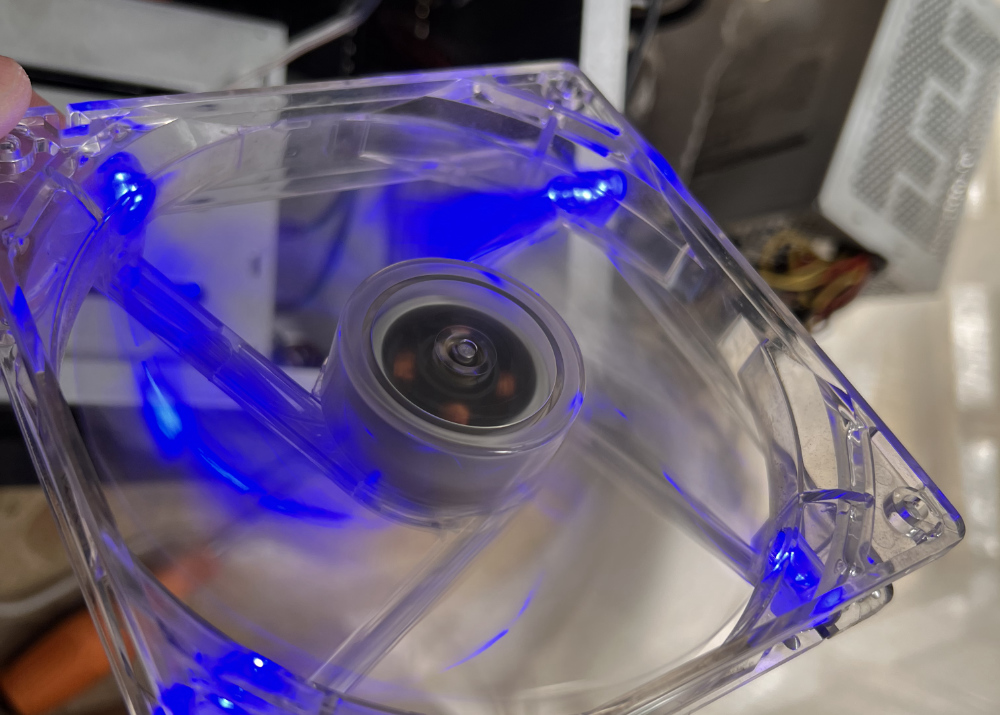
我有一台运行OpenMediaVault的NAS,它是由海鲜市场三百元钱淘来的蜗牛星际B款改造而来。搭载J1900的芯片,组建了软Raid10后用来存储数据,一直运行非常稳定。但其有一个非常大的弊端,就是风扇噪音特别大。收到的第一时间我就将电源更换为被动散热电源(后文有介绍)。我一度是拆除了风扇使用的,但是硬盘在夏天收到了60°C报警。为此我又尝试更换了静音风扇。
由于单纯的更换风扇并解决不了问题,风扇似乎总是以较大转速在工作。主板提供的是3pin接口,可以检测到转速。SATA拓展板也提供了3pin风扇接口(默认插入的就是SATA拓展板),是直连电源的,没有任何调整速度的操作。
因此我一开始的想法是直接通过Linux平台调整PWM控制风扇转速以此控制噪音或通过调整BIOS中对风扇转速的阈值控制噪音。
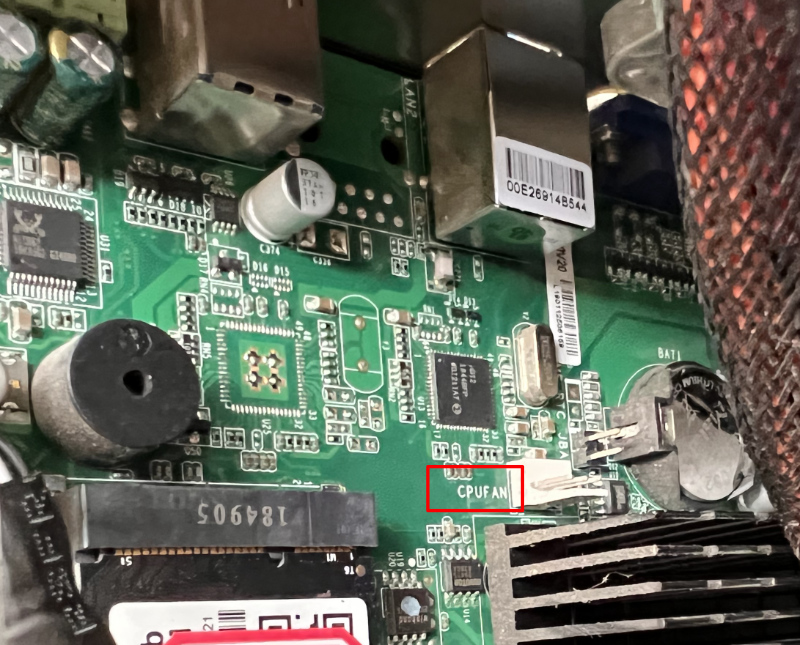
将3pin风扇插入主板的CPU FAN接口(提示:4pin风扇插入3pin接口无法调速)。
安装lm-sensors检测风扇转速和硬件温度(适用于Ubuntu、Debian等Linux系统):
apt install lm-sensors
执行sensors查看温度和风扇转速:
root@nas:~# sensors
soc_dts1-virtual-0
Adapter: Virtual device
temp1:        +35.0°C

coretemp-isa-0000
Adapter: ISA adapter
Core 0:       +34.0°C  (high = +105.0°C, crit = +105.0°C)
Core 1:       +34.0°C  (high = +105.0°C, crit = +105.0°C)
Core 2:       +35.0°C  (high = +105.0°C, crit = +105.0°C)
Core 3:       +35.0°C  (high = +105.0°C, crit = +105.0°C)

soc_dts0-virtual-0
Adapter: Virtual device
temp1:        +34.0°C
默认情况下显示了CPU温度但是没有显示风扇转速。
通过执行pwmconfig,看到如下结果:
root@nas:~# pwmconfig
# pwmconfig revision $Revision$ ($Date$)
This program will search your sensors for pulse width modulation (pwm)
controls, and test each one to see if it controls a fan on
your motherboard. Note that many motherboards do not have pwm
circuitry installed, even if your sensor chip supports pwm.

We will attempt to briefly stop each fan using the pwm controls.
The program will attempt to restore each fan to full speed
after testing. However, it is ** very important ** that you
physically verify that the fans have been to full speed
after the program has completed.

/usr/sbin/pwmconfig: There are no pwm-capable sensor modules installed
查阅资料得知,可以通过sensors-detect自动配置pwmconfig,对sensors有效。
root@nas:~# sensors-detect
# sensors-detect revision $Revision$
# Board: AMI Corporation Aptio CRB
# Kernel: 5.10.0-0.bpo.12-amd64 x86_64
# Processor: Intel(R) Celeron(R) CPU J1900 @ 1.99GHz (6/55/9)

This program will help you determine which kernel modules you need
to load to use lm_sensors most effectively. It is generally safe
and recommended to accept the default answers to all questions,
unless you know what you're doing.

Some south bridges, CPUs or memory controllers contain embedded sensors.
Do you want to scan for them? This is totally safe. (YES/no): yes
Module cpuid loaded successfully.
Silicon Integrated Systems SIS5595...                       No
VIA VT82C686 Integrated Sensors...                          No
VIA VT8231 Integrated Sensors...                            No
AMD K8 thermal sensors...                                   No
AMD Family 10h thermal sensors...                           No
AMD Family 11h thermal sensors...                           No
AMD Family 12h and 14h thermal sensors...                   No
AMD Family 15h thermal sensors...                           No
AMD Family 16h thermal sensors...                           No
AMD Family 17h thermal sensors...                           No
AMD Family 15h power sensors...                             No
AMD Family 16h power sensors...                             No
Intel digital thermal sensor...                             Success!
    (driver `coretemp')
Intel AMB FB-DIMM thermal sensor...                         No
Intel 5500/5520/X58 thermal sensor...                       No
VIA C7 thermal sensor...                                    No
VIA Nano thermal sensor...                                  No

Some Super I/O chips contain embedded sensors. We have to write to
standard I/O ports to probe them. This is usually safe.
Do you want to scan for Super I/O sensors? (YES/no): yes
Probing for Super-I/O at 0x2e/0x2f
Trying family `National Semiconductor/ITE'...               No
Trying family `SMSC'...                                     No
Trying family `VIA/Winbond/Nuvoton/Fintek'...               No
Trying family `ITE'...                                      Yes
Found `ITE IT8772E Super IO Sensors'                        Success!
    (address 0xa30, driver `it87')
Probing for Super-I/O at 0x4e/0x4f
Trying family `National Semiconductor/ITE'...               No
Trying family `SMSC'...                                     No
Trying family `VIA/Winbond/Nuvoton/Fintek'...               No
Trying family `ITE'...                                      No
...
根据对主板上搭载的芯片对应资料的查询和sensors-detect命令的提示信息,前两个问题我选择了yes,成功检测到ITE IT8772E Super IO Sensors,因此后续的问题可以都选择No(如果您的主板和我是同款的话)。这个配置工具已经非常人性化了,只要耐心查阅相关资料,就可以非常方便的匹配到你主板的配置信息。
然后执行/etc/init.d/kmod start重新加载内核模块:
root@nas:~# /etc/init.d/kmod start
[ ok ] Starting kmod (via systemctl): kmod.service.
果然再次执行sensors时得到了风扇转速相关的信息:
root@nas:~# sensors
soc_dts0-virtual-0
Adapter: Virtual device
temp1:        +35.0°C

coretemp-isa-0000
Adapter: ISA adapter
Core 0:       +35.0°C  (high = +105.0°C, crit = +105.0°C)
Core 1:       +35.0°C  (high = +105.0°C, crit = +105.0°C)
Core 2:       +35.0°C  (high = +105.0°C, crit = +105.0°C)
Core 3:       +35.0°C  (high = +105.0°C, crit = +105.0°C)

soc_dts1-virtual-0
Adapter: Virtual device
temp1:        +35.0°C

it8772-isa-0a30
Adapter: ISA adapter
in0:          +0.68 V  (min =  +1.38 V, max =  +2.29 V)  ALARM
in1:          +1.37 V  (min =  +1.12 V, max =  +2.34 V)
in2:          +1.99 V  (min =  +2.72 V, max =  +0.88 V)  ALARM
+3.3V:        +3.36 V  (min =  +1.03 V, max =  +2.57 V)  ALARM
in4:          +2.03 V  (min =  +2.80 V, max =  +3.01 V)  ALARM
in5:          +2.03 V  (min =  +1.10 V, max =  +1.94 V)  ALARM
in6:          +2.23 V  (min =  +1.46 V, max =  +1.42 V)  ALARM
3VSB:         +3.29 V  (min =  +2.52 V, max =  +4.82 V)
Vbat:         +3.19 V
fan1:           0 RPM  (min =   61 RPM)  ALARM
fan2:        1247 RPM  (min =   22 RPM)
fan3:           0 RPM  (min =   11 RPM)  ALARM
temp1:        +29.0°C  (low  = -118.0°C, high = -66.0°C)  sensor = thermal diode
temp2:        +31.0°C  (low  = +29.0°C, high = +25.0°C)  sensor = thermal diode
temp3:       -128.0°C  (low  = -25.0°C, high = +110.0°C)  sensor = disabled
intrusion0:  ALARM
这里的fan2提示1247 RPM就是插入到CPU FAN后主板通过传感器检测到的转速。
配置完成后,我尝试通过pwmconfig对风扇进行控制,但根据命令运行的提示,风扇并没有按预期停转,软件对风扇的任何控制都无效。
因此我只得想办法插入显示器来调整BIOS设置。我通过TypeC(USB)视频采集卡采集HDMI接口的数据,成功在平板电脑看到BIOS界面。
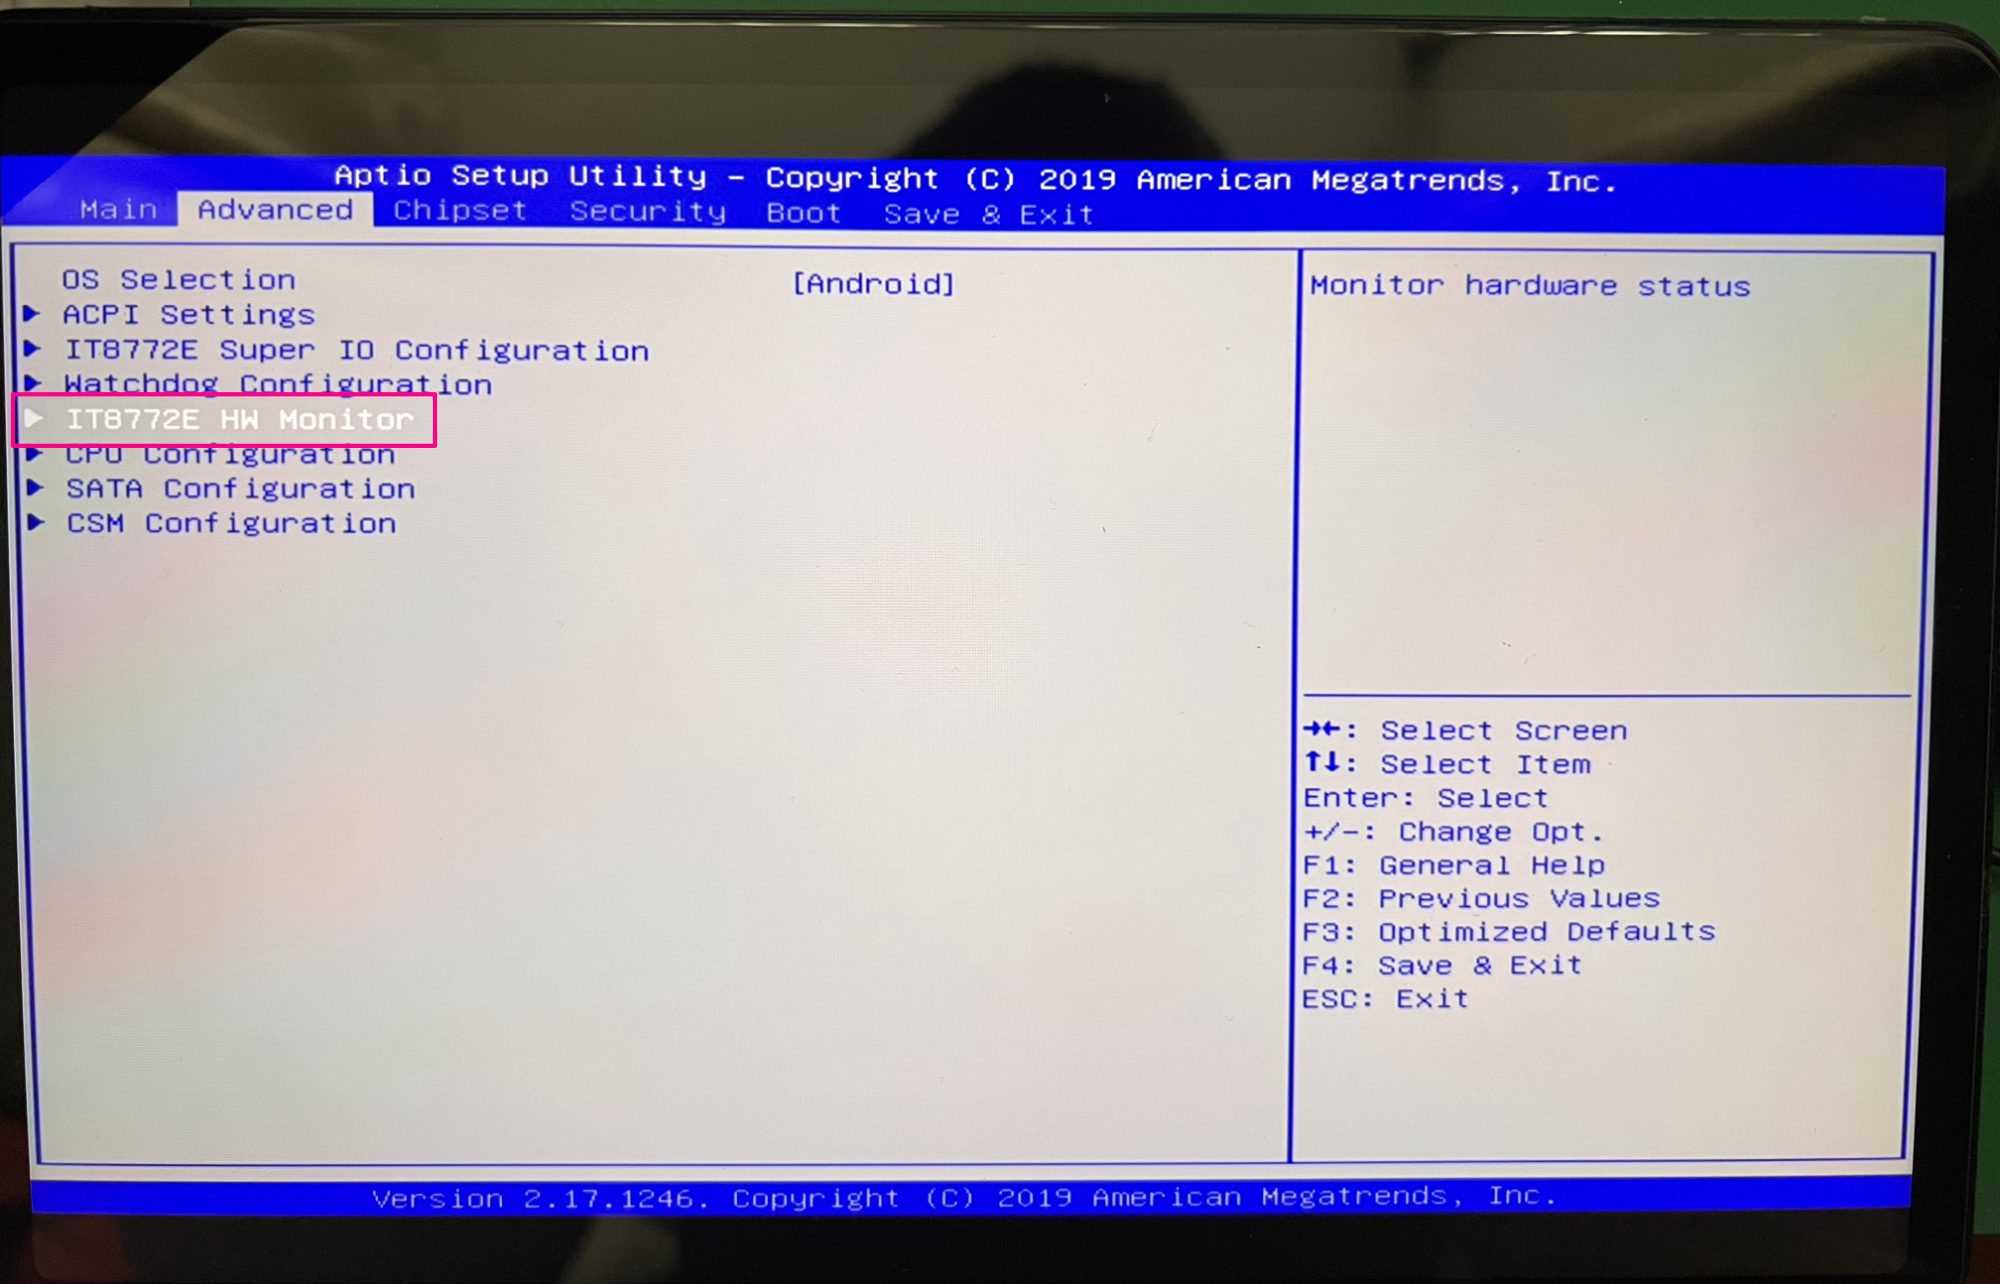
在这里可以看到硬件监控芯片正是IT8772E,和之前软件识别到的一致。因此也启发我们,不是非得去看主板上的芯片型号,或许直接在BIOS就会有显示,甚至直接运行sensors-detect大概率也是能自动检测到的。
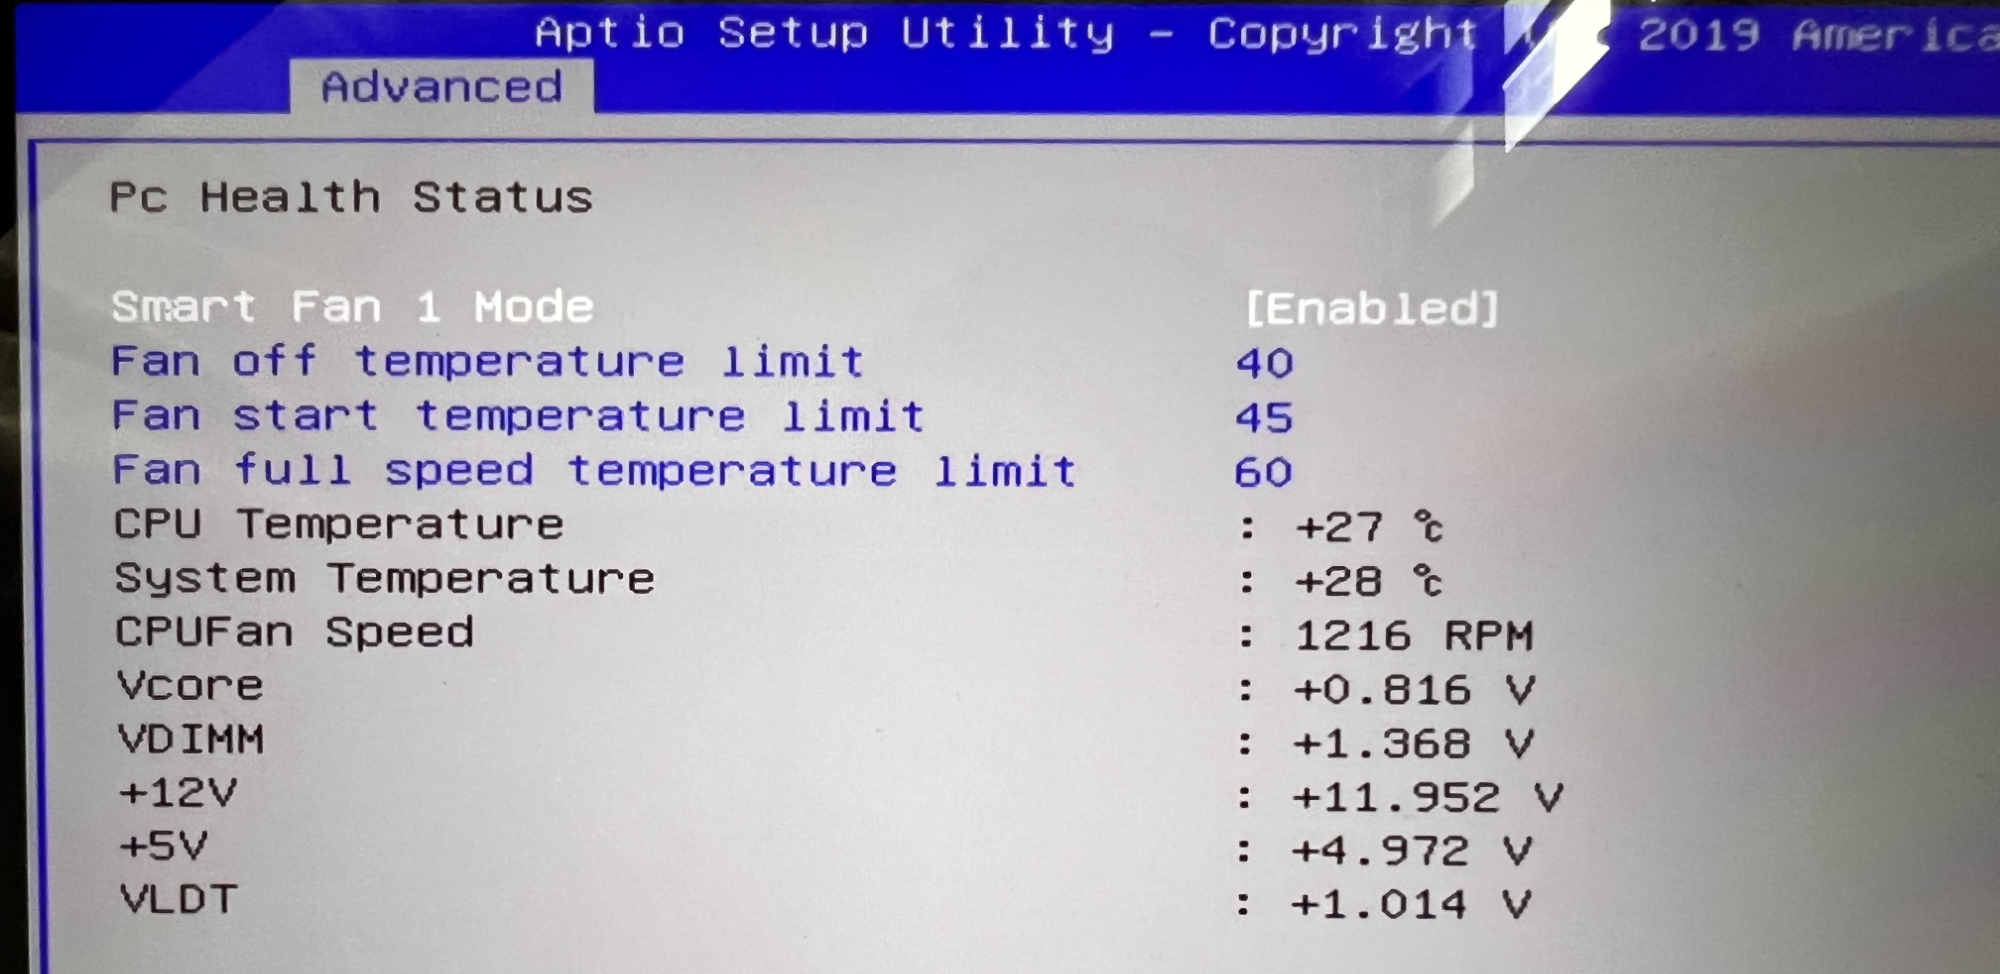
果然找到了风扇相关的配置信息。当时我还挺欣喜,不过经过数次尝试,发现这里的功能根本就没有真正实现,BIOS配置的风扇相关信息是无效的(毕竟是定制产品)。这个时候就只能上硬件方案了。
不过如果你的电脑主机也有类似的配置,且你买的是普通家用电脑品牌主板,那这些配置通常是有效的,通常会使用4pin风扇接口。你完全可以通过BIOS来控制风扇什么时候转,什么时候转得慢,什么时候转得快。
硬件方案
电源
电源实现无风扇无噪音很简单,买不带风扇的电源就好了,或者特别贵的模组电源,通常是不带风扇或者默认较低功耗/低温度风扇根本不动的。

国产长城静音电源还是挺稳的,用了五年多一点问题没有,有轻微电流声。
另外一种选择是购买DC-ATX直插电源模块和DC直流电源 。
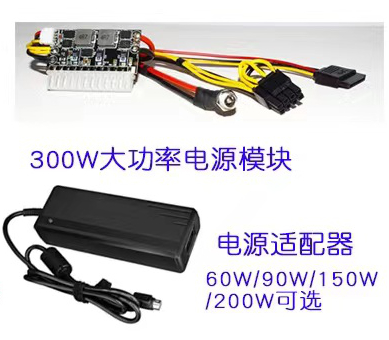
(上图经过原作者授权)
需要注意,请购买品质好的之流电源适配器,以免发生意外(300W的电源适配器在12V工作的电流高达25A,品质不佳的电源可能起火或功率不足)。
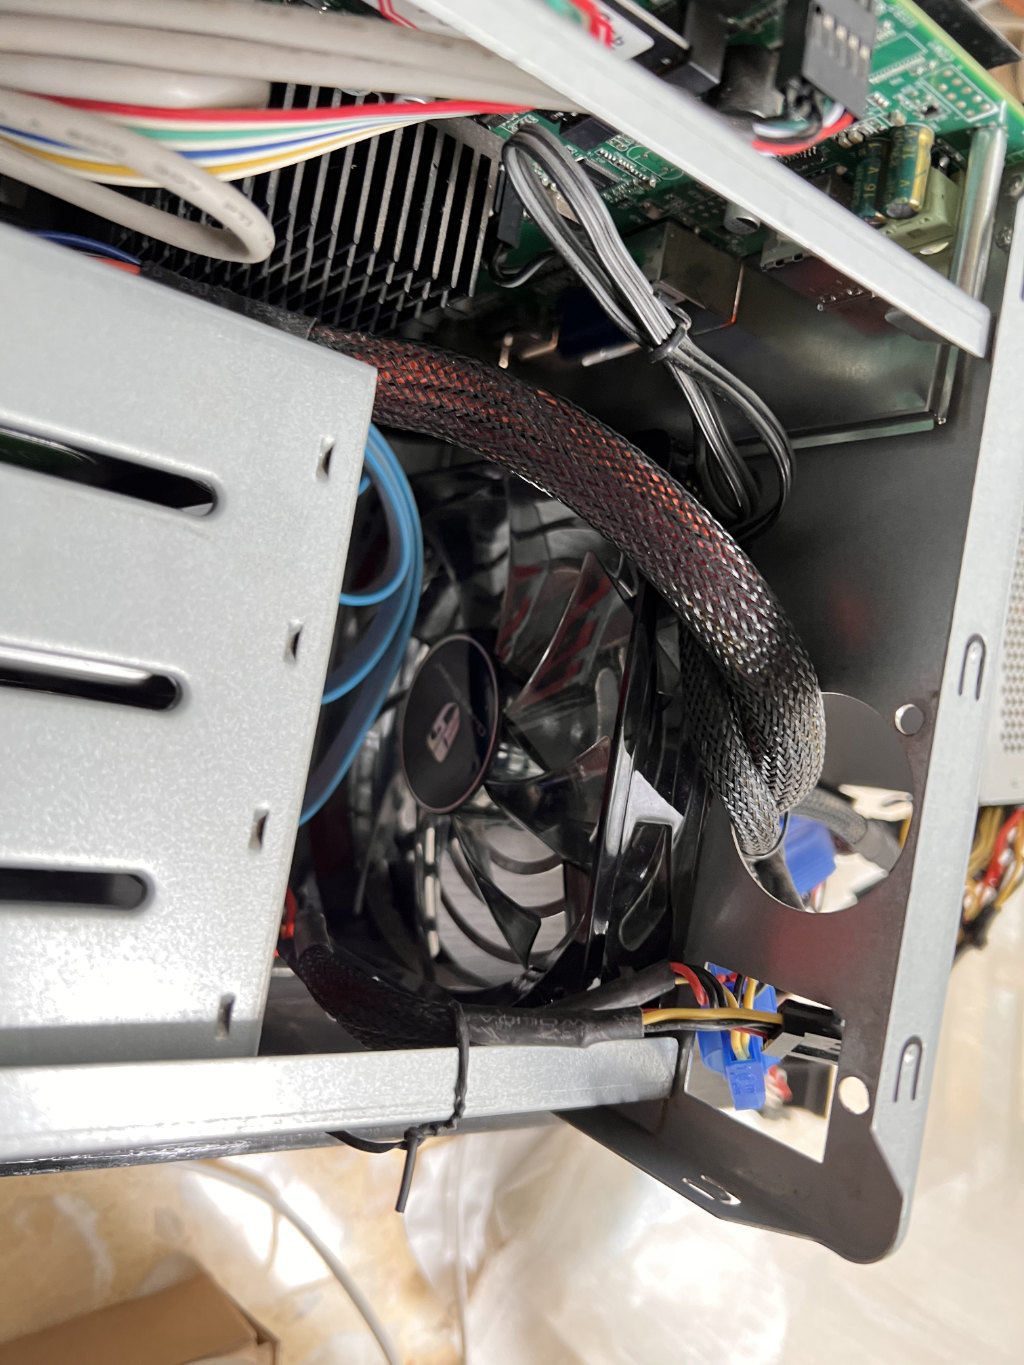
机箱风扇
可以购买3pin/4pin减速线实现风扇减速,减速效率20%-50%不等均有可选,一般几块钱一根还包邮。但是减速线我实测效果非常不好。一方面线里面就是个电阻,工作时候发热很大,增加了机箱内部的热量,还可能存在一定的安全隐患,另一方面减速线只是无脑减速,需要高转速的时候速度又上不来,且无法在低温的时候彻底关停风扇。
我最终选择了3/4线的带温控的风扇调速器。
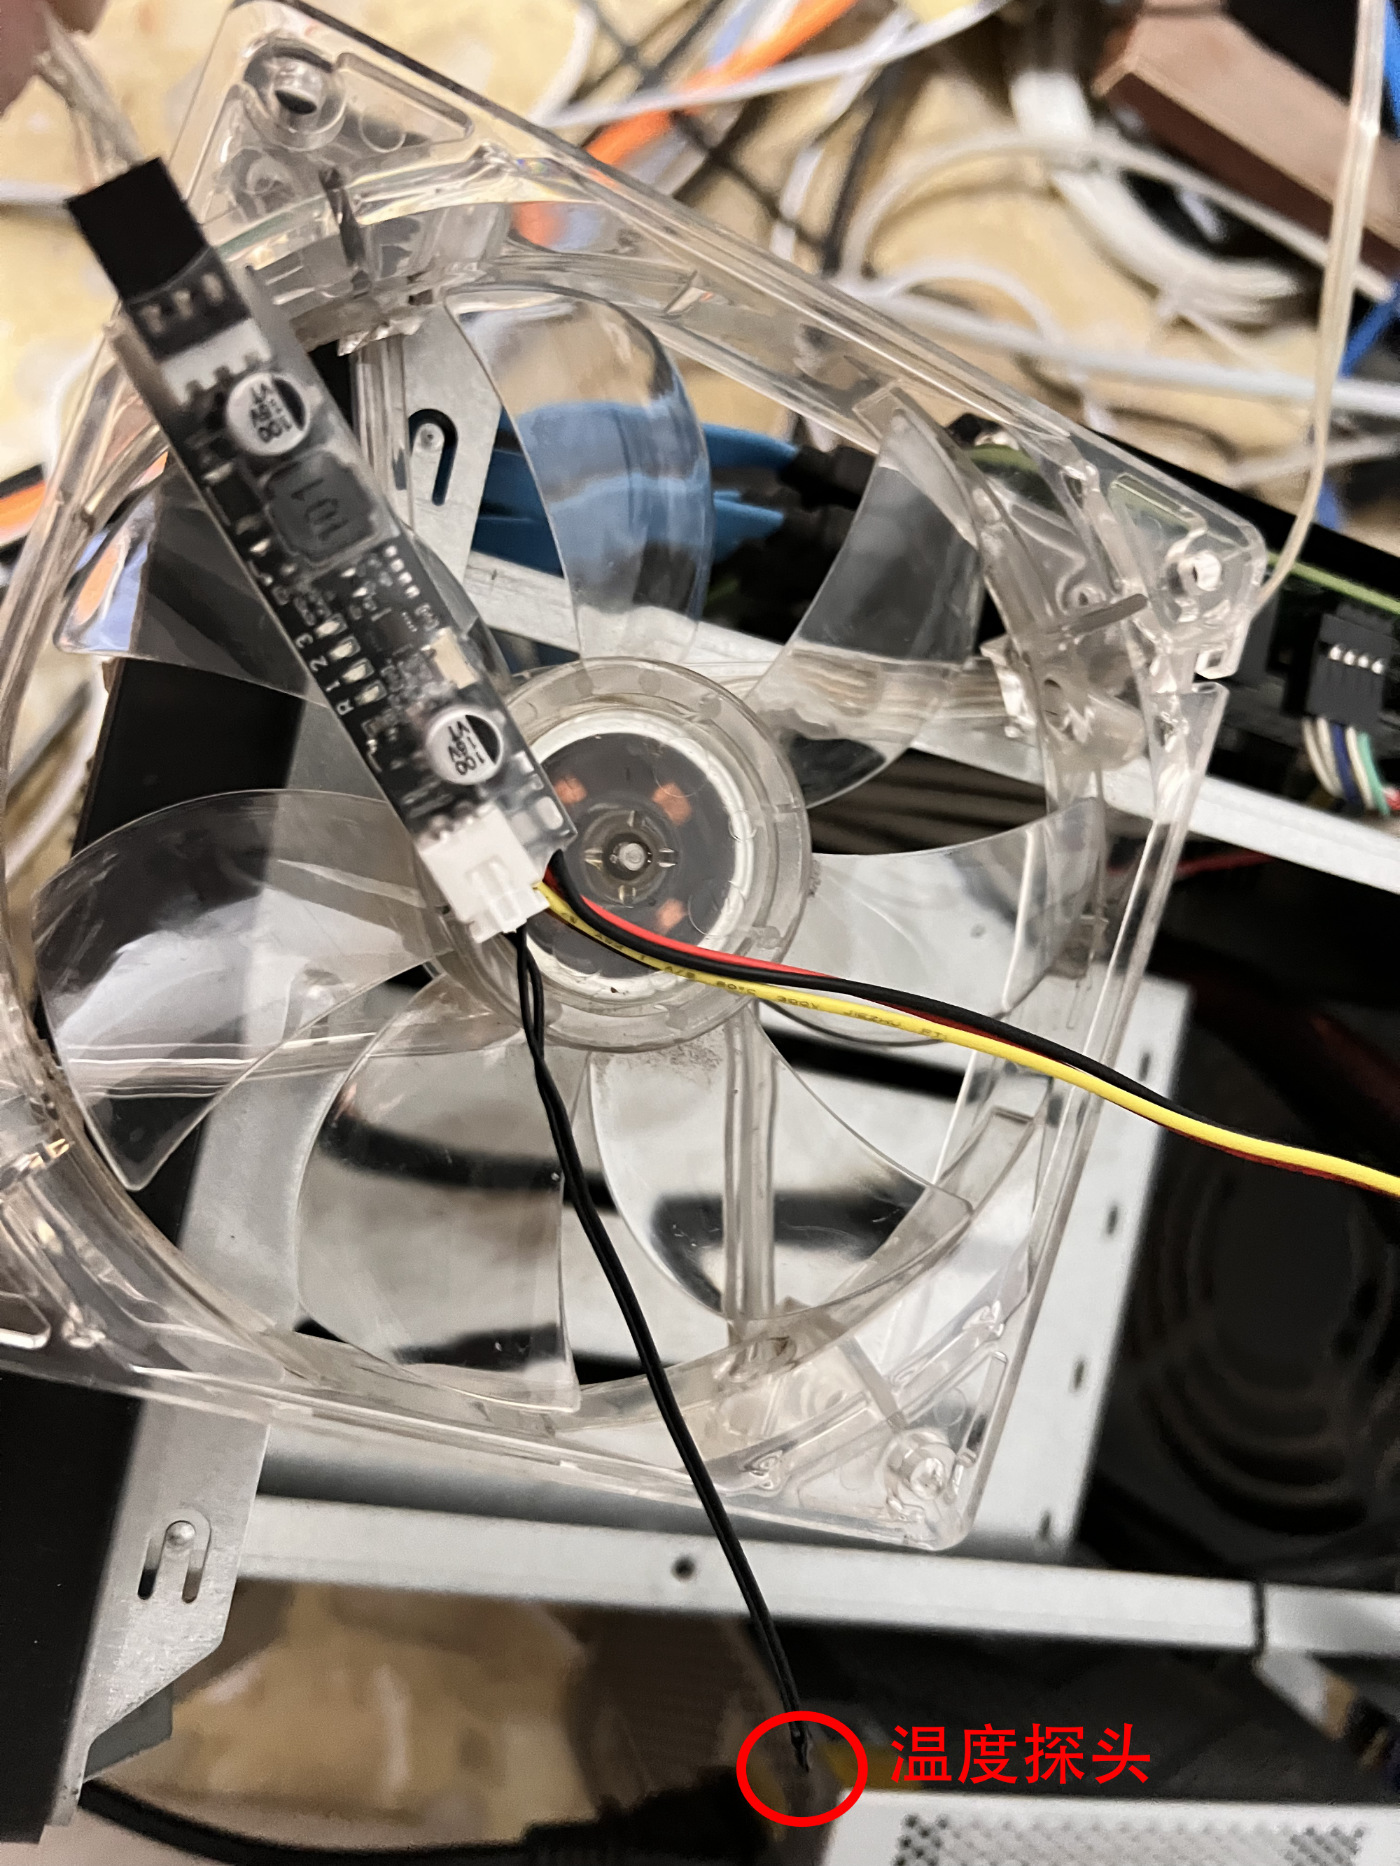
这个带温度探头的风扇调速器,支持直接插入原2pin/3pin/4pin接口取电,同时不影响主板获取转速,支持低温关停风扇,还可以对温度及转速进行手动控制。仅使用了一个按键就实现了很多种设置功能,设计这个板子的人不简单呀。大家改造的时候注意绝缘,为了绝缘我单独上了透明热熔胶套。
我给NAS和电脑主机都做了类似的降噪测试,现在低温/低功耗情况下风扇完全不转动,体验极佳。
其它
NAS最佳的存储方式仍然是机械硬盘,由于其工作原理限制,机械硬盘自身“咔咔咔”的响声是无法避免的。不过现在新型的机械硬盘支持以静音模式工作,可以通过NAS相关配置达到静音的目的。虽然硬盘本身的性能会受到限制,但是可以通过增加内存作为缓存以及增加UPS的方式实现安全、速度与噪音的平衡。

哈哈,我是把NAS 放在电视柜里面,电视柜带玻璃门,将风扇调到最低门一关完全听不到

机智!


hi~
哈喽 轶哥大佬
win11 24H2 26100.2605 ,按照如下修改成功:
Search: 8B 81 38 06 00 00 39 81 3C 06 00 00 75 Replace: B8 00 01 00 00 89 81 38 06 00 00 90 EB
老师你好,我希望能用一个openwrt路由器实现IPv4和IPv6的桥接,请问我该如何实现?我尝试了直接新增dhcpv6的接口,但是效果不甚理想(无法成功获取公网的ipv6,但是直连上级路由的其他设备是可以获取公网的ipv6地)
你好
,为什么我这里是0039 813C 0600 0075 16xx xx xx,只有前6组是相同的,博客中要前8位相同,这个不同能不能照着修改呢?我系统版本是Win1124H2